
Wednesday, November 29, 2017
Nick and Gabe
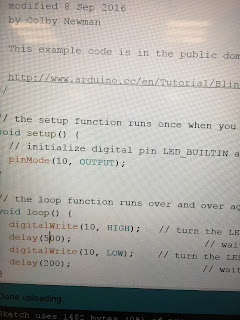
To get an LED Connected you can't just simply connect it and you're good. First you connect the long leg of the LED to the alligator clip. Then take a 220 resister and connect it to the other side of the clip. Then plug the short leg into the GND port of the board and the resister to PWM 10. In the program change the where ever it says Builtin LED to the number 10. Verify, Upload, and you are done!

Module 13 (such/tischler)
to get the LED to light up from the set, you must attach the LED light and resistor to each ends of a wire, When attaching the wire to the light, you must attach it to the longer part. From there you must put the resistor into port 10 on the board and put the bulb in GND, which stands for ground. Now you must change the code from the power going to the build in LED to port 10. So where it says LED_BUILDIN, change it to 10. Verify the program and upload it to the board.


_______________________________________________
One Port
Two Separate Ports
Christmas Tree
Nick Google Doc Demo
https://docs.google.com/document/d/1Tq5sYoNqeH5IWSk5AlnaMBFh5-U0BkGd5nZzps6xD3I/edit?usp=sharing
Shawn Google Doc
https://docs.google.com/document/d/1muu9BM5zOXuQO8Z2eOtZOpY8cSPHi-jBAVcEpc6etxk/edit?usp=sharing
A.Such Google Doc M13
https://docs.google.com/document/d/13HDC15z-zbY70x5e9mk2q4AyQjFIAfrNbe7wnzz_2Ow/edit?usp=sharing
Wednesday, November 15, 2017
Post Robot Fight
Our robot only did not do good because we made a mistake in our code right before we fought. We fixed the code when we had one game left and destroyed the opposition. Our bot really would have won the championship if it did not just drive off the dohyo because of the faulty code.
The games that our bot won, it went under the enemy robot and picked it up and pushed it off the dohyo. Our ramp was really well made and it worked well. But half the time, our bot just drove off the course by itself and that was why we did not see success at first.
Why Our Bot Will Win

Our bot will win because our program is well thought out and well executed. Also, we have a ramp that can push and get under other robots and force them off the dohyo. The sensors are perfectly placed on the robot in order to maximize efficiency and stay on the dohyo. Our robot is also not too heavy or clunky. It is small and speedy, yet powerful.
Wednesday, November 8, 2017
Robot Design and Strategy
Our design consists of the IR sensor in the front scanning for the other robot. Our touch sensor will be in the back so the robot will be able to react if the other robot comes behind ours. The light sensor will also be in the back incase our robot is being pushed back, it will see the white line and be able to push back.
The basic strategy is to quickly get out of the way right in the beginning while some robots will attack right at the start. Once we dodge we will have the robot scanning with the IR sensor to find and attack the other robot. We also have a ramp attached to the front to lift up opposing robots so they have less traction to push back on us.
Nick https://docs.google.com/document/d/1ZKx_MGi1tpmG4PrL7foEqiSSa7kUlU6utWxvhEuKzBY/edit?usp=sharing
Shawn
https://docs.google.com/document/d/131PrJ_BXcXpJsQxNg6-8VghmNwsa0R1ac-Li_YAeoPc/edit
AJ
https://docs.google.com/document/d/1ExMLaL6CLDuzlR5X-StPDmr3jVva_jZSNnqECKzsBiM/edit?usp=sharing_eip&ts=5a034055
Gabe
https://docs.google.com/document/d/17hYUQVUkQGan0jG6KPt9n8oWaYam88PUTliuUCbwzFo/edit?usp=sharing


Subscribe to:
Posts (Atom)
-
 The 3D printed samples look very nice the way they are shaped, they're color adds to the way they look. They seem very durable and witho...
 -
Waste The data we are looking to aim for would be product waste, waste management, and waste management efficiency. Knowing the layout an...
