Course as is
week 1-5 3d printing
week 6 Engineering as a whole
week 7-8 analytics
week 9-12 LEGO
week 13-14 Christmas lights
week 15 Final
Course Redone
week 1-2 CAD (here we would learn basic design and how to use computer drawing programs)
week 3-5 3d printing
week 6-7 Engineering disciplines ( go more in depth on engineers and what they do, help us choose one to go into)
week 8-10 Analytics
week 11-14 LEGO/coding/Christmas lights (learn different types of coding from the Christmas lights and LEGOs)
week 15 Final
Wednesday, December 13, 2017
Friday, December 8, 2017
Gabe module 13 Doc
https://docs.google.com/document/d/15QqSRg-Jz1roEDDsSiy--DMhGHcA_VvYgJ6ajDo0t8Y/edit?usp=sharing
Wednesday, December 6, 2017
What I learned
https://docs.google.com/document/d/10YwzCb4OhGwi9_nybCr39U58sZMKLRv8mhyoym3JY48/edit?usp=sharing
Aaron's Google Doc
https://docs.google.com/document/d/1dijjRktnnzJaujDWoLtJrbMGqJjdb80ZfgIrYegjskQ/edit?usp=sharing
Shawn Tischler
https://docs.google.com/document/d/1eGqMAAgyTK79Kb3Am2UTd7dNBQDadGxrdIm4jTjzsP8/edit?usp=sharing
Nick Malzone Individual LEDs google doc
https://docs.google.com/document/d/1TXaJECzhkyQ_NDK4X3w4WLKvAk1hpBy6Lu16QW5YTO4/edit?usp=sharing
Wednesday, November 29, 2017
Nick and Gabe
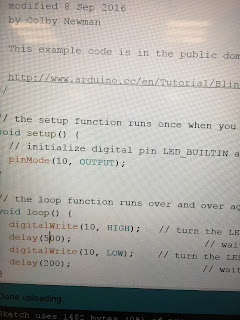
To get an LED Connected you can't just simply connect it and you're good. First you connect the long leg of the LED to the alligator clip. Then take a 220 resister and connect it to the other side of the clip. Then plug the short leg into the GND port of the board and the resister to PWM 10. In the program change the where ever it says Builtin LED to the number 10. Verify, Upload, and you are done!


Module 13 (such/tischler)
to get the LED to light up from the set, you must attach the LED light and resistor to each ends of a wire, When attaching the wire to the light, you must attach it to the longer part. From there you must put the resistor into port 10 on the board and put the bulb in GND, which stands for ground. Now you must change the code from the power going to the build in LED to port 10. So where it says LED_BUILDIN, change it to 10. Verify the program and upload it to the board.


_______________________________________________
One Port
Two Separate Ports
Christmas Tree
Nick Google Doc Demo
https://docs.google.com/document/d/1Tq5sYoNqeH5IWSk5AlnaMBFh5-U0BkGd5nZzps6xD3I/edit?usp=sharing
Shawn Google Doc
https://docs.google.com/document/d/1muu9BM5zOXuQO8Z2eOtZOpY8cSPHi-jBAVcEpc6etxk/edit?usp=sharing
A.Such Google Doc M13
https://docs.google.com/document/d/13HDC15z-zbY70x5e9mk2q4AyQjFIAfrNbe7wnzz_2Ow/edit?usp=sharing
Wednesday, November 15, 2017
Post Robot Fight
Our robot only did not do good because we made a mistake in our code right before we fought. We fixed the code when we had one game left and destroyed the opposition. Our bot really would have won the championship if it did not just drive off the dohyo because of the faulty code.
The games that our bot won, it went under the enemy robot and picked it up and pushed it off the dohyo. Our ramp was really well made and it worked well. But half the time, our bot just drove off the course by itself and that was why we did not see success at first.
Why Our Bot Will Win

Our bot will win because our program is well thought out and well executed. Also, we have a ramp that can push and get under other robots and force them off the dohyo. The sensors are perfectly placed on the robot in order to maximize efficiency and stay on the dohyo. Our robot is also not too heavy or clunky. It is small and speedy, yet powerful.
Wednesday, November 8, 2017
Robot Design and Strategy
Our design consists of the IR sensor in the front scanning for the other robot. Our touch sensor will be in the back so the robot will be able to react if the other robot comes behind ours. The light sensor will also be in the back incase our robot is being pushed back, it will see the white line and be able to push back.
The basic strategy is to quickly get out of the way right in the beginning while some robots will attack right at the start. Once we dodge we will have the robot scanning with the IR sensor to find and attack the other robot. We also have a ramp attached to the front to lift up opposing robots so they have less traction to push back on us.
Nick https://docs.google.com/document/d/1ZKx_MGi1tpmG4PrL7foEqiSSa7kUlU6utWxvhEuKzBY/edit?usp=sharing
Shawn
https://docs.google.com/document/d/131PrJ_BXcXpJsQxNg6-8VghmNwsa0R1ac-Li_YAeoPc/edit
AJ
https://docs.google.com/document/d/1ExMLaL6CLDuzlR5X-StPDmr3jVva_jZSNnqECKzsBiM/edit?usp=sharing_eip&ts=5a034055
Gabe
https://docs.google.com/document/d/17hYUQVUkQGan0jG6KPt9n8oWaYam88PUTliuUCbwzFo/edit?usp=sharing


Tuesday, November 7, 2017

Tuesday, October 31, 2017
The Blocks
Steering and moving is an important aspect to take into account especially if the robot will have to fight other robots. Lucky the V3 robots are pretty good with turning and and executing commands. The medium motor works nicely considering the weight of the bot itself and is able to move the bot quickly to the task at hand. The sound does get a bit annoying but supposedly there is a way to mute it. The display, although simple, becomes tedious especially when having to type names into it. On the other hand it is very easy to navigate through.
Wednesday, October 25, 2017
T-Shirt Design
Design SnapShot


Simple Design, features the Sumo Bot Challenge (the current Module), Sacred Heart Engineering, and a little art design.
Wednesday, October 18, 2017

Friday, October 13, 2017
Ploting

To present the graphs we would divide everything into increments of 2 for weight and 10 for time. At 30 minutes we replaced the bag which reset the graph back down to 0 to then continue adding food.
Initial Analytics
In the beginning we saw a steady growth of food being wasted with all in all a steady pattern of people coming. At 30 minutes 66 people came and there was about 15 and a half pounds of food waste, which does not seem like a lot but it is.
Wednesday, October 11, 2017
63s Analytics
Waste
The data we are looking to aim for would be product waste, waste management, and waste management efficiency. Knowing the layout and operation at 63s, we see that trying to discover the consumer perspective on the leftover food that is discarded and how it is discarded from this food resource on campus.
Strategy
Waste food will be collected instead of taking to kitchen cleaners, will be emptied into bucket and weighed to see the amount of food wasted over the course of an hour. Data will be collected periodically every 5 minutes. We will be collecting data on weight of the food, used plates, and people over time.
Wednesday, October 4, 2017
Smart Home
Best Engineering Qualities
Kanga: Turf/Ground Pool Cover. The idea to cover a pool with solid ground in order to walk over it and not lose space
Team International: Conveyer belt for transportation around the house for convenience.
Pacha: Glass covered soccer field. Indoor field with outdoor qualities.
PioNeers Projects: Smart home device. Siri for the hoe to control all electronics
Wednesday, September 20, 2017

Results and Reflections
After seeing each group's product, we averaged out the results on our rubric:
Team International's Key Clip - 8/8
Kangas' Speaker - 7/8
Pachas' Chin Guard - 5/8
Pioneer's Charger Clip - 6/8
We liked Team International's product the best due to the functionality, durability, and cleanness.
Criteria Does not meet
(0 points)
Meets (1 point)
Exceeds (2 points)
Functionality: Product cannot preform or breaks under stress
Has some set backs but able to work just not at full capacity
Product is able to faction normally and as designed
Durability: Gadget cannot break away from support
Gadget can break away but cannot preform function needed to full capacity
Gadget is able to break away from support pieces and is sturdy enough to preform the function needed
Is it 3D printable Product: either collapses while printing or is not able to come out cleanly
Able to print with some setbacks/limits
Able to print with no problems whatsoever
Easy to clean
too much support to have a clean product
Able to break away from support but not completely clean from access material
Final product is clean or easy to break off of supports
As for the hand held bottle opener. the opening piece the goes on the cap seems to be a little small, Also the lever piece seems to very weak so it might break off. Also there should be 4 finger places instead of 3. I think the overall shape be ok just some sizing differences should make it better
For Nick's handheld bottle opener, it looks to be a little blocky of a design. It could use more rounded edges to make it look smoother. It also looks a bit thin, so I'm not sure if it could successfully open a bottle. I think with a couple of tinkers, it could be very successful.
For our limitation design, we made a zipper to test how small and detailed the 3D printer can get. The zipper pieces fell apart once we took them off of the support pieces. This means that when printing you need to have you design big enough to be able to be pulled apart form the support.
For the helicopter design, the amount of support needed to be broken down was excessive. It took forever to breakdown and in that process, it broke certain pieces off. Other than that I realize that when building a design like that before printing, it might be easier to build in separate designs and just put it together when everything is taken a second
Wednesday, September 13, 2017
Clip: the clip idea had the lever of the piece that comes out going the other way so no chains would come out. they had a very well done design on TinkerCAD and it looked like it will work well. the pin idea is very smart because there is one piece that will fit in the whole and one bigger piece that will make sure it stays in place .
Speaker: Although the design looks simple when the layers were ungrouped it showed that they layered to make the walls of the speakers stronger. From the looks of it, it will work very well.
Shin Guard: The shin guard model looked very good. It looked like it could perfectly fit around a chin and guard it efficiently. They would need to add some kind of padding to make it useful in a read game, and they said they would. So they have it planned out pretty well for practical use. Overall, I really liked the sleek look of the design and smooth edges. The guard was thick enough so that it wouldn't shatter easily and it looked lightweight. It was a good design.
Wire Guard: The wire guard is coming along nicely. The group members expressed some difficulty in the design because there is an issue not only giving the wire enough support to be functional, which requires the gap to be tighter. On the other side of the coin, the gap can't be too tight if not the wire can't actually be inserted.


Limitations of the 3D printer
For the first design, we are testing out the drying time of the plastic. we are thinking that if you have only a small connection with two pieces off of the base that the plastic will not dry enough and start to droop down. the second design we tested the size capability of the printer. We are hearing about 3D printing body parts which can be pretty big. If you wanted to build a chair or something, you would be limited to only having to print out the pieces and not the whole chair as a whole. The last design will test the accuracy of the printer. If you needed a part to have exact dimensions on a small scale the printer. For zippers, the whole design relays on being lined up exactly on a small scale.


TinkerCAD Cube

The physical cub that we got from the cube was 1 inch by 1 inch by 1 inch. the small square holes on each face of the cube is 1/2 inch by 1/2 inch making the remaining amount around the holes 1/4 inch. As for the ball, we guessed that the ball has a 1/2 inch diameter because it looked like it lined up perfectly with the hollowed out square on each side.
On TinkerCAD, the dimensions all the dimensions seemed to be halved, so the whole cube is 1/2 inch by 1/2 inch.

This bottle opener design is similar to out with the finer hole on the back end and the hook on the opposite side. The only real difference is the hooking action our is more of a pull while this design is a hooking or pushing. When deconstructing and ungrouping this design had a lot more holes and cuts while in comparison, our design is set up with more shapes and fewer holes.
Friday, September 8, 2017
What Happened in the Tutorials
In the tutorials we learned the basics of the program of how to move the camera and shape on a X,Y,Z axis. The possibilities are endless if your imagination and creativity are.
Wednesday, September 6, 2017
Tinkercad Tutorial


During this TinkerCad tutorial, I learned all the basics of TinkerCad. I learned how to cut shapes, make objects, resize them and much more. I am looking forward to making my newly engineered objects and using this app to 3D Print them. This relates to engineering because this is a creator's app that can be used to craft objects and then print them to test them out in real life.
Redesign
1 We made very minimal changes to our designs. as for the full handled opener, we adjusted the angle at which the two parts come together. this causes a more comfortable grip and movement as you open the bottle.
2 The main design was altered minimally. The tail of the piece was given a little more length so the user could have a little more leverage. Another change that was added was how the bottle cap will sit onto the system with a little edge added by the hook. Lastly a little hole was added onto the tail so a key chain could be added.
3 The design was changed into a more efficient, slick looking model. Instead of the hook like opener, I changed it into a double sided compartment where the cap fits in between the two openers and you crank the opener and it will smoothly open. This design makes it so there is a cleaner, smoother open, with little to no chance of spilling any liquid because it will come off quickly and effortlessly.
4 the design was not altered that much. When working in the design program I changed how the bottle will hook to the actual cap. It gives the bottle a more slick design and makes it look better.
2 other ideas
The two other ideas that we could have made were a phone case with a built in card holder and water flavoring straw. we did not choose to make these because we thought a bottle opener would be more useful. the practicality of the bottle opener out weighs those of the phone case and straw. Also we thought we could make cooler designs with bottle opener than straws and phone cases.
Wednesday, August 30, 2017
3D Printer Design- Bottle Opener

Basic design and metric is on functionality and look that will achieve opening a bottle.
The 3D printed samples look very nice the way they are shaped, they're color adds to the way they look. They seem very durable and without major manipulation hold together strongly. They serve the purpose they are built for. When it comes to they're complexity, the way they are put together is very intricate. Knowing how a 3D printer works, you can obviously see the individual layers is very cool. You can see basically how they were built up and and in which direction the machine operates.
Scientists at Princeton University are being very innovative and creative with the 3D Printers by using them to basically create "bionic ears". They are adding together “bio-printed organic materials” and electronics. These bionic ears are said to perform better than average human ears and can be used as replacements in the cases where people lose or have to remove this type of cartilage that is a key body part for our sensory systems.
http://www.huffingtonpost.com/2013/05/07/bionic-ear_n_3224379.html
From prior knowledge of 3D Printers the time necessary for a design or concept to be printed, even as small a quarter, is extremely long and almost monotonous. So when it comes to larger and more intricate designs the time could take up a ton of time. With more and more limitations being overcame such as printers going from plastic to metal, metal to concrete, and even to organic material such as cartilage from humans (see image below). The application has fewer and fewer limitations every day. Obviously time limits how quickly something can be built, but also the fact with certain objects, especially those that move, need to be built piece by piece. So definitely the application to the real world for 3D printers is almost endless, but restrictions can definitely take away from the usefulness of the printer.

http://www.huffingtonpost.com/2013/05/07/bionic-ear_n_3224379.html
Subscribe to:
Comments (Atom)
-
 During this TinkerCad tutorial, I learned all the basics of TinkerCad. I learned how to cut shapes, make objects, resize them and much mo...
 -
https://docs.google.com/document/d/1dijjRktnnzJaujDWoLtJrbMGqJjdb80ZfgIrYegjskQ/edit?usp=sharing